Generate CSR file using openssl
Follow below instruction generate CSR file using shell command.
Step – 1. Log in to your server via your terminal client (ssh)
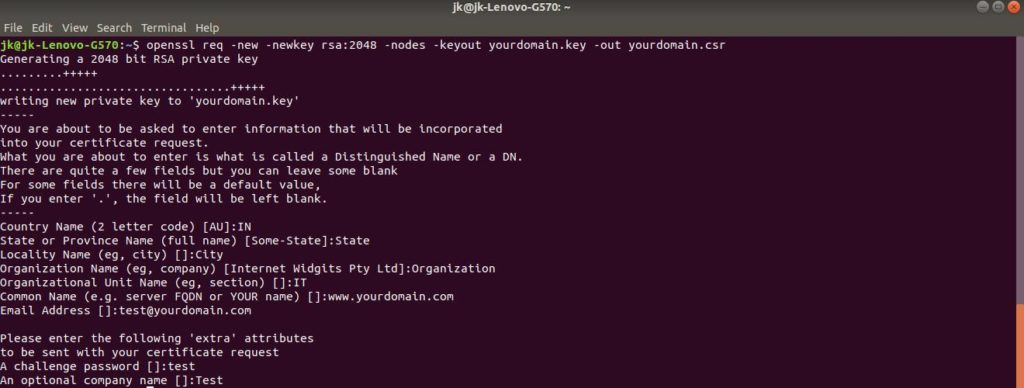
Step – 2. Run command

Step – 3. Generate files
a. Now started the process for generating the following two files:
Private Key file :- Used to generate the CSR and later to secure and verify connections using the certificate.
CSR(Certificate Signing Request) file :- Used to order your SSL certificate and later to encrypt messages that only its corresponding private key can decrypt.
b. when prompted for
    Country name – 2 letter code of country name
    State of province Name
    Lacality Name
    Organization name
    Organizational Unit name
    Common name(domain name) – type the full qualified domain name
    Email address
    challange password
    optional company name.

c. Now, your OpenSSL .csr file is created.
Step – 4 : Order your SSL/TLS Certificate.
a. Open the .csr file you created with a text editor.
b. Copy the text, including the —–BEGIN NEW CERTIFICATE REQUEST—– and —–END NEW CERTIFICATE REQUEST—– tags, and paste it in to the your certificate provider.
Step – 5 : Save Private Key.
Save the generated .key file. You need it later to install your SSL certificate.
Step – 6 : Install certificate.
After you’ve received your SSL certificate from your certificate provider, you can install it on your server.
Installing & Configuring Your SSL Certificate.
Step – 1 : Copy the certificate files to your server.
a.  Log in to your certificate provider and download the intermediate and your primary certificate files.
b.  Copy theser files(private key, primary certificate and intermediate certificate files into your server folder
    e.g create SSL folder in etc/httpd/conf
Step – 2 : Create seprate .conf file for SSL configuration and include that file in httpd.conf file
a. When we also provide SSL we have to listen to the HTTPS port(443) in addition.
    Listen 443 https

b. SSL configuration.
SSLPassPhraseDialog exec:/usr/libexec/httpd-ssl-pass-dialog
SSLSessionCache         shmcb:/run/httpd/sslcache(512000)
SSLSessionCacheTimeout  300


c. Virtual host configuration
<VirtualHost _default_:443>

ErrorLog logs/ssl_error_log
TransferLog logs/ssl_access_log
LogLevel warn

#   SSL Engine Switch:
SSLEngine on

#   SSL Protocol support:
# List the enable protocol levels with which clients will be able to
# connect.  Disable SSLv2 access by default:
SSLProtocol all -SSLv2

#   SSL Cipher Suite:
SSLCipherSuite HIGH:MEDIUM:!aNULL:!MD5:!SEED:!IDEA


#   Server Certificate:
SSLCertificateFile /etc/httpd/conf/ssl/yourdomain.crt

#   Server Private Key:
SSLCertificateKeyFile /etc/httpd/conf/ssl/yourdomain.key
#   Server Certificate Chain:
SSLCertificateChainFile /etc/httpd/conf/ssl/yourdomainIntermediate.crt


#   SSL Protocol Adjustments:
BrowserMatch "MSIE [2-5]" \
         nokeepalive ssl-unclean-shutdown \
         downgrade-1.0 force-response-1.0

#   Per-Server Logging:
CustomLog /app/logs/ssl_access_log "%t %h %{SSL_PROTOCOL}x %{SSL_CIPHER}x \"%r\" %b"

</VirtualHost>
d. include ssl.conf file into httpd.conf file
Include conf/ssl.confStep – 3 : Redirect from 80 to 443(https) — add below configuration in httpd.conf
RewriteEngine on
ReWriteCond %{SERVER_PORT} !^443$
RewriteRule ^/(.*) https://%{HTTP_HOST}/$1 [NC,R,L]
Step – 4 : Test your Apache configuration file before restart apache server.
apachectl configtest
Step – 5 : Restart Apache
apachectl stop
apachectl start
Testing your SSL/TLS certificate installation.
- For best results, make sure to close your web browser first and then re-launch it.
- Visit your site with the secure https URL (https://www.yourdomain.com)
- You can also perform SSL test using URL (https://www.ssllabs.com/ssltest/)
